Run your CloudResearch Connect study with Plumeform, end to end.
A complete setup guide: what to set in Plumeform, what to enter in each step of Connect's project setup, how to test every exit before you launch, and how to approve, reject and pay bonuses afterwards. Every Plumeform screenshot below is the product.
- Setup time
- About 15 minutes, plus a pilot.
- Free on every plan
- participantId capture, completion codes and redirects, one response per participant, test mode, CSV.
- Pro
- Screening and quotas with a screen-out exit, attention checks, bonus and reject lists, XLSX.
- You need
- A published Plumeform survey and a Connect researcher account with funds.
Try the participant loop first, no account needed.
A two-question survey opened with sample panel IDs; submit it to see the code and captured IDs on a check page. The demo uses Prolific's parameter names. Connect's are captured the same way.
00THE ROUND TRIP
How the loop works
Participants start on Connect, take your survey on Plumeform, and return to Connect to show they finished. Connect puts their IDs on the survey link; the survey keeps those IDs with the response and sends each participant back through the right completion branch.
1Connect
Sends the participant to your survey
Through your project link, withparticipantId,assignmentIdandprojectIdadded for each participant.2Plumeform
Keeps the IDs with the response
Saved automatically, partial answers included, and checked so each participant answers once.3Plumeform
Sends them back with a code
Finishers to the completion redirect; screened-out participants to their own branch.4Connect
You review, approve and pay
Approvals, rejections and bonuses are keyed byparticipantId, which is in every row of your data.
CHECKLIST
Before you start
- The survey is finished and published. Only a published survey accepts responses; edits after publishing create a new version, and each response records its version.
- You know every way out. Completed, screened out, and quota full (which leaves by the screen-out exit). Each gets a completion branch in Connect.
- You have a pilot planned. Connect offers a pilot when you launch; use it to check the data, the timing and each exit.
- Your consent text covers declining. Declining consent records nothing, and a participant who came from Connect is asked to return the study there, so the place goes to someone else.
01IN PLUMEFORM
Set up the survey
Open the survey in the builder and go to Settings → Fielding. Set how participants come in and how they leave, then copy the survey link from the Share panel. You will paste values from Connect into two of these fields, so it is easiest to keep both tabs open.
Step 1: Finish and publish the survey
Build and publish as usual. The welcome screen shows an estimated completion time; your pilot will give you the real median to enter in Connect.
Step 2: Set the completion code and the redirect
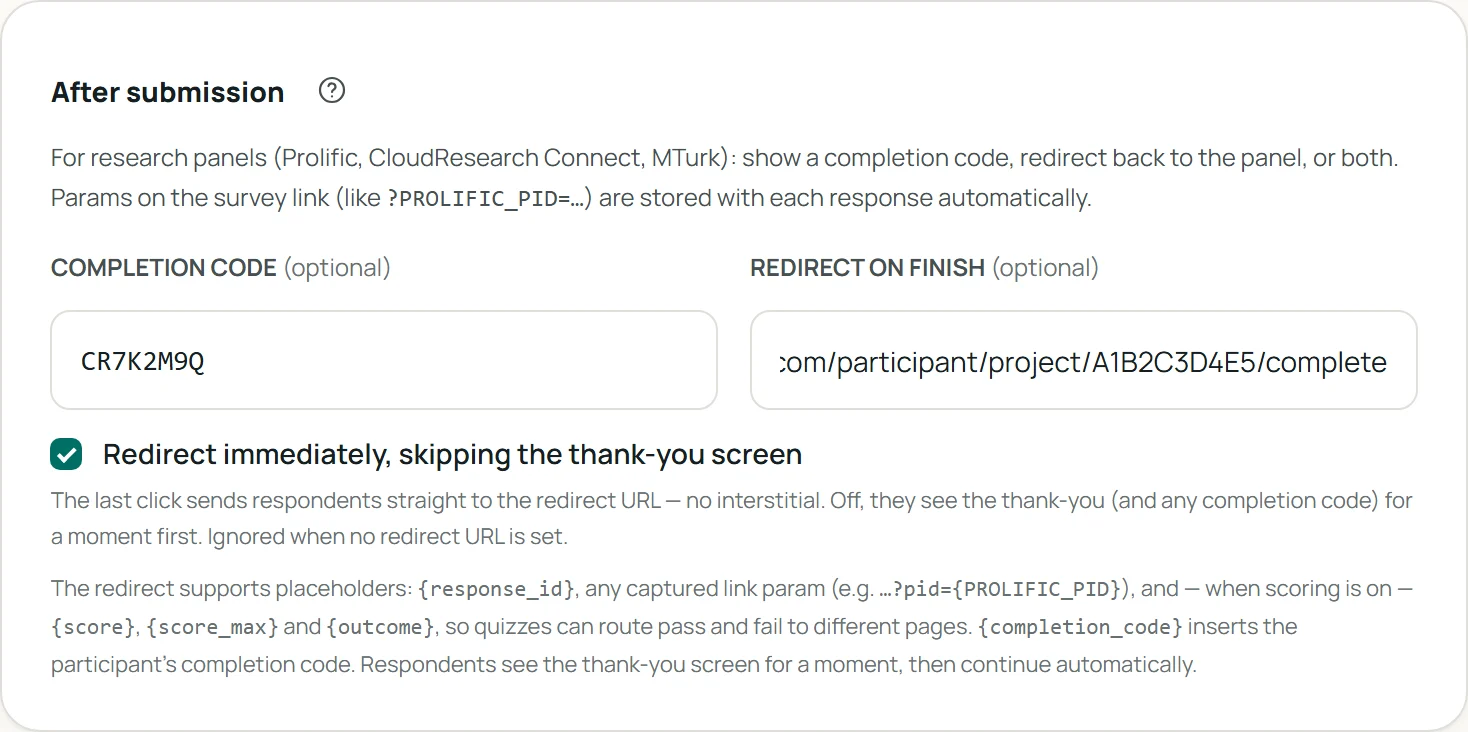
In the After submission card, use either completion method Connect offers, or both:
 (opens the screenshot at full size in a new tab)
- REDIRECT ON FINISH: the completion redirect link Connect gives you in the project's completion settings. It looks like
https://connect.cloudresearch.com/participant/project/…/complete; paste it exactly as Connect shows it. - COMPLETION CODE: Connect's fixed completion code. It appears on the thank-you screen for participants to enter on Connect, and covers anyone whose redirect did not run.
- Redirect immediately: skips the thank-you screen. Off, it shows for 2.5 seconds (with the code) and then continues on its own.
Step 3: Allow one response per participant
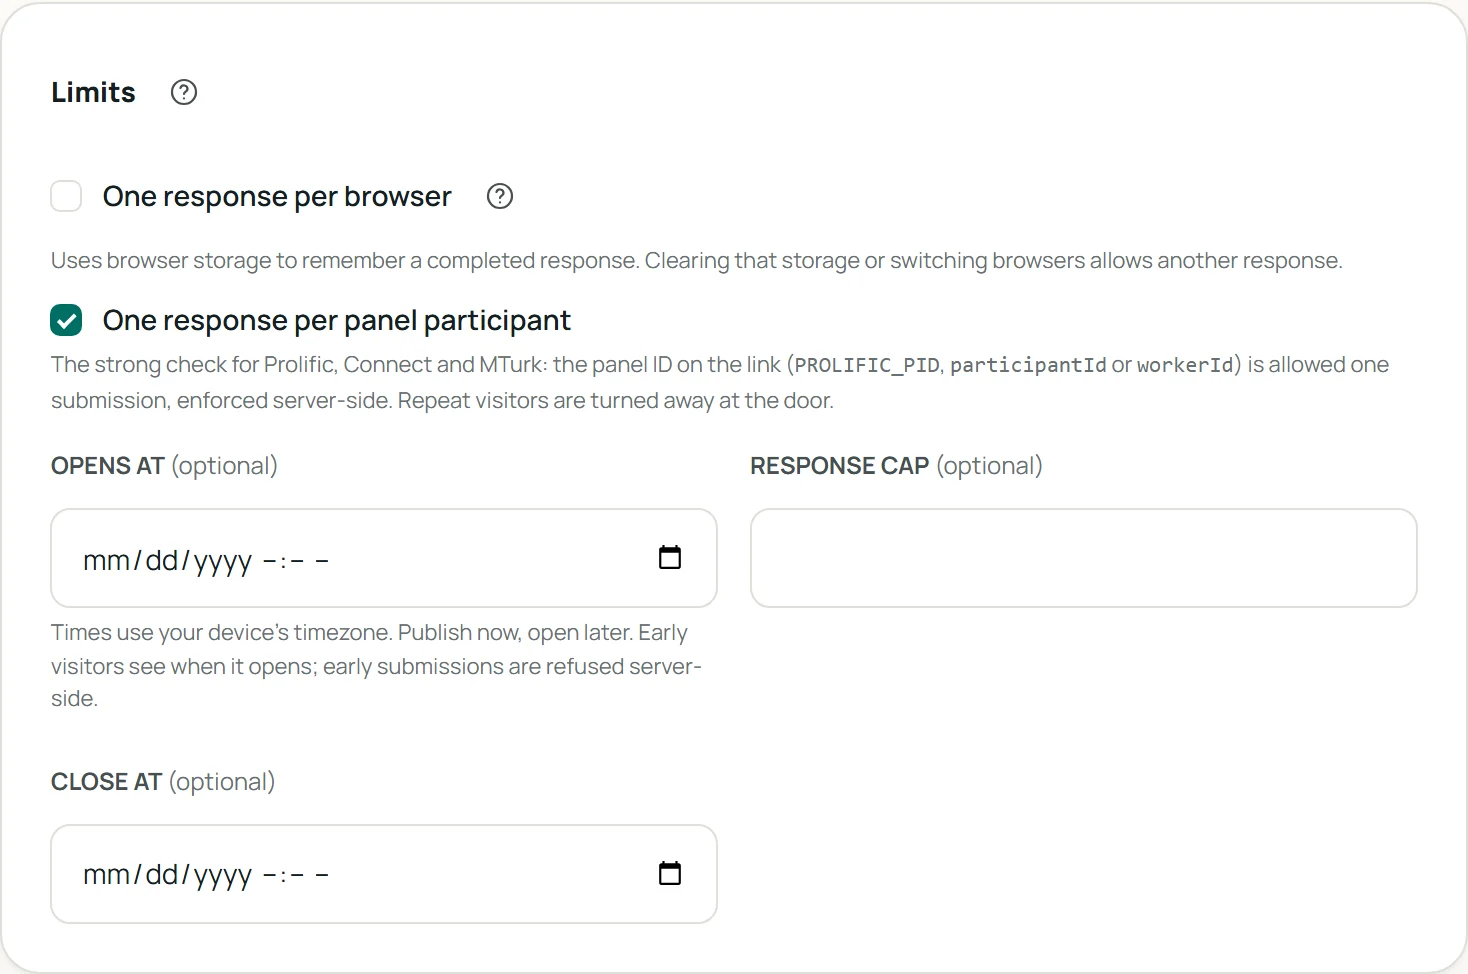
In the Limits card, turn on One response per panel participant. The participantId on the link is then allowed one submission, enforced on the server. A participant who already finished, or was screened out, is turned away before the first question.
 (opens the screenshot at full size in a new tab)
Step 4: Add a screening exitPRO
Screen people out with a logic rule using the screen out action, or cap segments with quotas. In the Screening & quotas card, put the screen-out branch's link from Connect in SCREEN-OUT REDIRECT and its code in SCREEN-OUT CODE (you create the branch in Part 2, step 11).
- Put the screener first, so no one is screened out after real work.
- When a quota fills, the next matching participants are screened out at the next page, through the same exit.
- Screened-out participants never count as responses or against your monthly limit.
Step 5: Turn on the research checks you needOptional
Attention checks flag failures in results and exports and feed the reject list. Informed consent adds an agree/decline screen; anyone who declines is asked to return the study on Connect. Desktop only turns phones away politely before anything starts; match Connect's device settings to it. Bot protection blocks certain scripted submissions without a CAPTCHA. All four are Pro.
Step 6: Copy the survey link
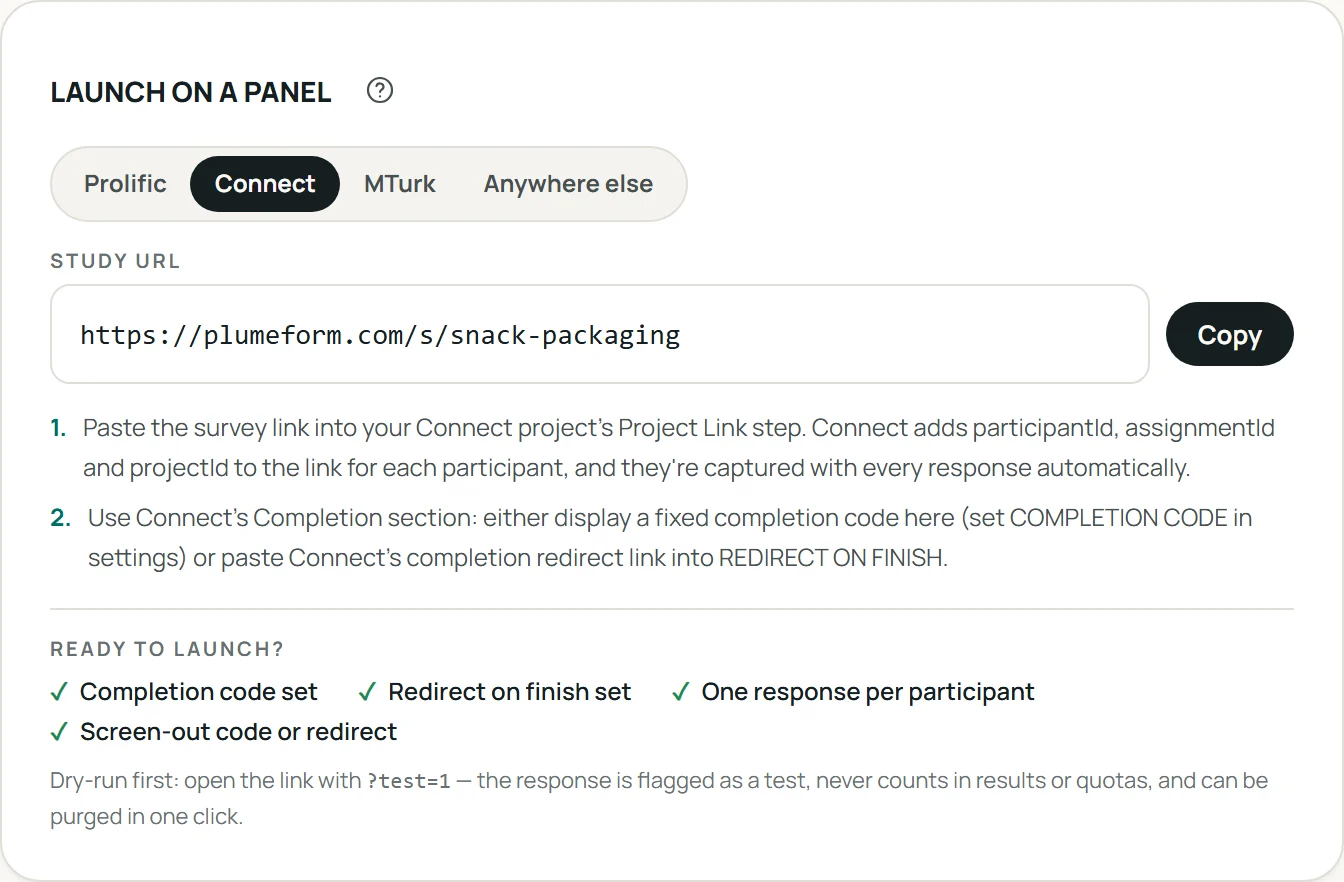
In the survey's Share panel, open Launch on a panel and choose Connect. Connect adds its own parameters, so the link is the plain survey link.
 (opens the screenshot at full size in a new tab)
https://plumeform.com/s/YOUR-SLUG02IN CONNECT
Create the Connect project
In Connect, choose Create Project. Its wizard runs through the steps below; the cards list what to enter. CloudResearch updates Connect from time to time, so if a label differs, its project setup guide (opens in a new tab) is the reference.
Step 7: Project type and basic information
- Project name
- What participants see. Plain and specific, with the length: “Snack packaging (5 min)”.
- Instructions
- What the study involves, how long it takes, any bonus rule, and whether some people are screened out early.
- Devices
- Match the survey. If Plumeform's Desktop only is on, allow desktop only here.
Step 8: Paste the project link
- Project URL
- The survey link from the launch kit,
https://plumeform.com/s/YOUR-SLUG. This is where Connect sends participants who accept the project. - Participant IDs
- Passed on the linkConnect adds
participantId(with a capital I), andassignmentIdandprojectId, to the link. Plumeform saves all three with the response; no survey-side setup is needed. If the step offers to pass participant information in the URL, keep it on.
CloudResearch's survey integration article (opens in a new tab) explains the parameters; Plumeform needs none of the per-platform steps it describes.
Step 9: Set the cost
- Estimated time
- The median from your pilot. Plumeform times every response, and the Fieldwork tab shows the median.
- Payment
- At or above Connect's minimum pay rate for that time, and more for demanding tasks.
- Participants
- Start with a pilot-sized number; increase once the pilot checks out.
Step 10: Target participants
- Demographics
- Target on Connect everything it can filter on; screen in the survey only what it cannot.
- Earlier participants
- If people from a related earlier project should not take part again, use Connect's targeting to leave them out; within this survey, one response per participant already covers repeats.
Step 11: Set up the completion branches
Each branch is one way of finishing, with its own redirect link, code and pay. The default branch is for completers; add one for screen-outs if the survey screens anyone out.
- Type
- Manual ReviewApprove after looking at the data; best with attention checks. Approve and Pay approves every completion automatically.
- Redirect link and code
- Copy both into Plumeform's After submission card (step 2).
- Type
- Partial CompletePays screened-out participants a reduced amount for the time they spent. Give it a clear label, such as “Not eligible”.
- Redirect link and code
- Copy both into Plumeform's SCREEN-OUT REDIRECT and SCREEN-OUT CODE (step 4).
CloudResearch's guide to completion branches (opens in a new tab) and project completion article (opens in a new tab) cover the options in full.
03BEFORE LAUNCH
Test every exit
Walk each way out of the survey once, as a participant, and check both ends: what the participant sees, and what was recorded.
Step 12: Dry-run with test mode
Open the survey with sample Connect IDs and test=1:
https://plumeform.com/s/YOUR-SLUG?participantId=TEST001&assignmentId=TEST&projectId=TEST&test=1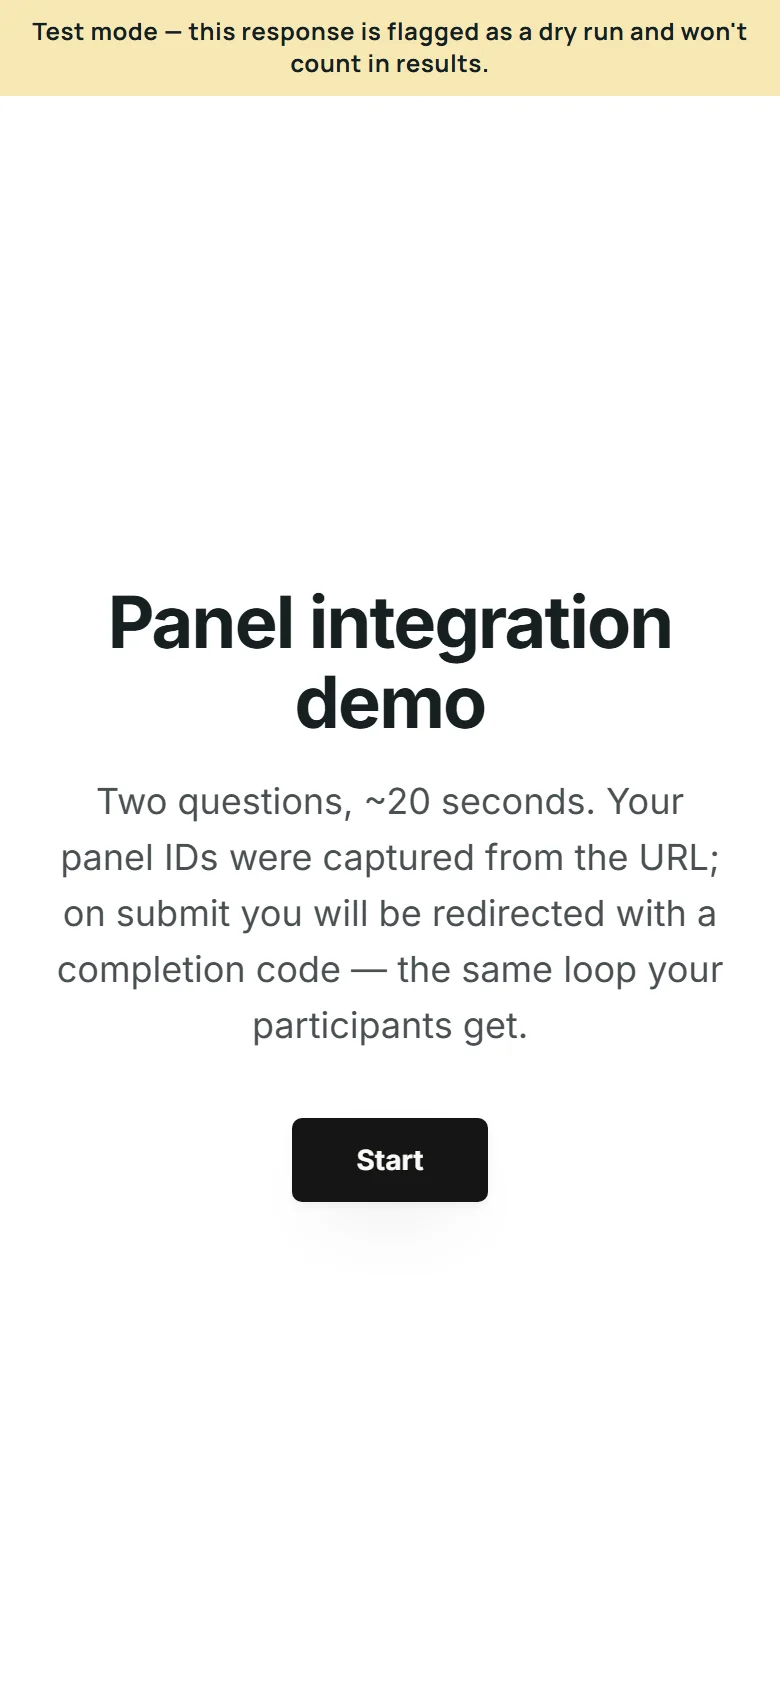
A test response is:
- stored and flagged, so you can check what was captured;
- left out of results, exports, quotas and the one-per-participant check;
- removable in one click (Delete them in the results header).
Use a new participantId for each run.
Step 13: Walk every way out
- Complete the survey: you should arrive at Connect's completion link.
- Answer so you are screened out: the screen-out screen, then the screen-out branch's link.
- Fill a quota (a limit of 1 while testing): the next matching run is screened out.
- After the pilot, reopen the link with a pilot participant's ID and without
test=1: the one-response check turns you away. - Decline consent, if you ask for it: nothing is recorded, and the page asks you to return the study.
Step 14: Pilot on Connect
When you launch, Connect asks whether to run a pilot or the full study. Pilot with ten or twenty participants, then check the export has participantId, the timing matches what you pay for, and the screen-out rate is what you expected.
04FIELDWORK
Launch and monitor
Launch the full project on Connect. Results update as responses arrive.
Step 15: Watch the right numbers
- Fieldwork: completes, people in progress, screen-outs, drop-off by question and median time.
- Quality: speeders, straight-liners, failed attention checks, duplicate and pasted text, and bot-protection signals, each a flag to review rather than a verdict.
- On Connect: submissions waiting for review and anyone who returned without a code.
05AFTER COLLECTION
Approve, reject and pay bonuses
Connect approves, rejects and pays bonuses one participant at a time or by uploading a CSV under Manage Participants, keyed by participantId. See CloudResearch's participant management article (opens in a new tab).
Step 16: Approve
Export the data (CSV on every plan, XLSX on Pro). Every row has participantId and its quality flags; the Quality tab can also copy the clean and flagged participant IDs. Build the approval file from the participants you accept, in the format Connect's upload dialog describes, and upload it with the approve action.
Step 17: Reject only with evidencePRO
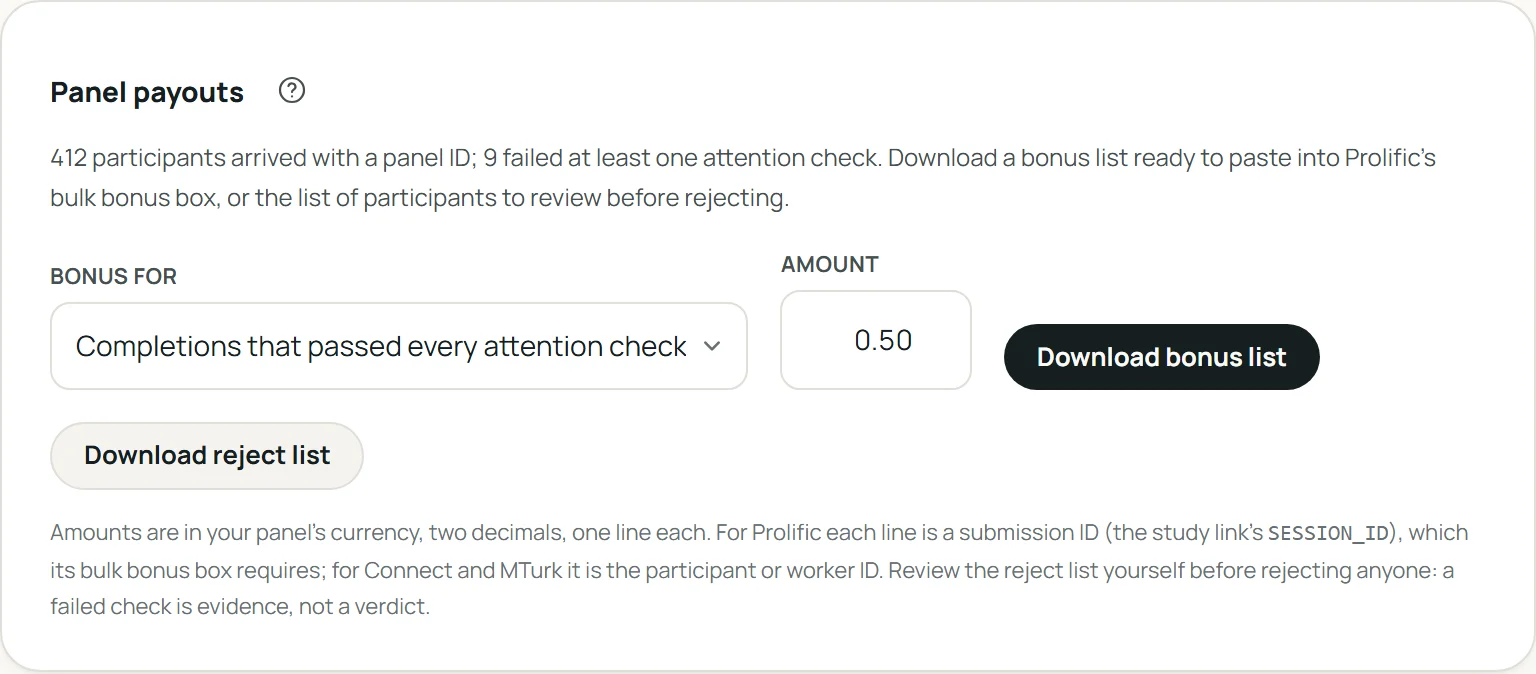
Analysis → Panel payouts → Download reject list lists participants who failed an attention check, with the question. Review each response before rejecting, and give a clear reason.
Step 18: Pay bonuses by uploadPRO
The Panel payouts card downloads a bonus list of participantId,amount lines, one per participant. Pay every completion, completions that passed every attention check, or an amount per quiz point.
 (opens the screenshot at full size in a new tab)
Upload it under Manage Participants → Upload CSV with the bonus action, checking the columns against the format the upload dialog shows. State the bonus rule in your project instructions before anyone starts.
Reference
Reference
Connect's link parameters
| Parameter | What it identifies | What Plumeform does with it |
|---|---|---|
participantId | The participant | Saves it, uses it for one response per participant, and keys the bonus and reject lists on it. |
assignmentId | This participant's session in the project | Saves it with the response. |
projectId | The Connect project | Saves it, so one survey can serve several projects. |
Where each value goes
| Value | Copy from | Paste into |
|---|---|---|
| Survey link | Plumeform: Share → Launch on a panel → Connect | Connect: Project Link |
| Completion redirect and code | Connect: the default completion branch | Plumeform: REDIRECT ON FINISH and COMPLETION CODE (After submission) |
| Screen-out redirect and code | Connect: the screen-out branch | Plumeform: SCREEN-OUT REDIRECT and SCREEN-OUT CODE (Screening & quotas) |
What each plan covers
| Feature | Free | Pro |
|---|---|---|
| participantId, assignmentId and projectId saved with every response | ✓ | ✓ |
| Completion code and redirect, redirect immediately | ✓ | ✓ |
| One response per panel participant | ✓ | ✓ |
| Test mode (?test=1) | ✓ | ✓ |
| CSV export with the ID columns | ✓ | ✓ |
| Screen-out rules and quotas, with a screen-out exit | ✓ | |
| Attention checks, consent screen, desktop only, bot protection | ✓ | |
| Bonus and reject lists, XLSX, research pack | ✓ |
Free includes 100 responses a month; Pro, 10,000. See pricing.
Connect's side of this guide follows CloudResearch's researcher help centre as of September 2026. CloudResearch is a separate company and changes Connect on its own schedule; where a label differs, its help centre is the authority.
Troubleshooting
The export has no participantId column.
Participants finished but show as not submitted on Connect.
Screened-out participants were marked incomplete or unpaid.
A participant says they were told they had already responded.
Participants stay on the thank-you screen.
Does this work for Mechanical Turk through CloudResearch?
Can I change the survey while the project is running?
Prepare your study before recruiting
The same setup for Prolific, including bulk bonuses by submission.
One response per person, across studies and panels.
Connect eligibility, quotas, and participant endings.